Scene Introduction
In a cozy corner in SubnetBits’ advanced networking lab, equipped with a demo setup for Cisco OfficeExtend, Sophie the Intern approaches Professor Network.
OfficeExtend(OEAP) Introduction
Good morning, Professor! I need your help. This weekend there will be a maintenance window on the firewalls cluster that are providing our remote VPN solution. I need an alternate way to connect to the corporate network from home, because I want to access our lab remotely, for training purposes.
Hey, Sophie. Great timing. I was just about to test a feature called OfficeExtend that is designed to extend a corporate WLAN to remote locations like an employee’s home. It It uses Cisco OfficeExtend access points (OEAP), installed in a remote location, to establish secure communication over the Internet to a wireless controller. Let me tell you about the key points related to this solution:
- User Experience: The experience at a home office is the same as at the corporate office.
- Security: DTLS encryption between the AP and the controller ensures top-level security. It’s important to note that DTLS is permanently enabled on Cisco OEAPs.
- Remote LAN (RLAN): OEAP have physical LAN ports. If wired clients connect to the OEAP via these physical LAN ports, RLAN is used to authenticate wired clients through the controller, treating their traffic like wireless client traffic.
- Network Address Translation (NAT) Compatibility: Cisco OEAPs are designed to work behind NAT devices.
- AP Group Limitations: OfficeExtend access points should be in the same AP group, which should contain no more than 15 WLANs.
So, it’s like having a secure, mini corporate network at home?
Exactly. It seamlessly extends the corporate network, maintaining the same security and user experience. And guess what, Sophie?
What, Professor?
I have a spare Cisco 1810 access point that can be configured as an OfficeExtend AP and I’ll teach you how to do it. Also, keep in mind, for future implementations, that only specific APs can be configured as OEAP, so be sure to consult the AP’s data sheet before trying to configure it as OEAP.
Wow, that’s perfect. I can’t wait to start with the configuration.
Configuring OEAP on Catalyst 9800(IOS XE)
Before we begin with the actual configuration you need to keep in mind that the WLC must be reachable from the internet. So, you either place the WLC, were the OfficeExtend APs will connect, in the DMZ and assign it a public IP, or configure a 1:1 NAT rule on the firewall/router and map a public IP to the controller’s private IP used for wireless management.
Than, on the controller, depending on the code you are running, you can specify via either the CLI or GUI the public NAT IP that the controller is using.
For example in code 16.12 you can only configure the NAT IP via the CLI using the below commands:
| Location1-WLC1(config)#wireless management interface vlan 99 nat public-ip 100.1.1.1 |
|---|
| Location1-WLC1(config-mgmt-interface)#capwap-discovery public |
While in 17.x code the commands are almost the same, but it offers also the option to configure the NAT Public IP that the WLC is using via the GUI
| Location1-WLC1(config)#wireless management interface vlan 99 |
|---|
| Location1-WLC1(config-mgmt-interface)#public-ip 100.1.1.1 |
| Location1-WLC1(config-mgmt-interface)#capwap-discovery public |
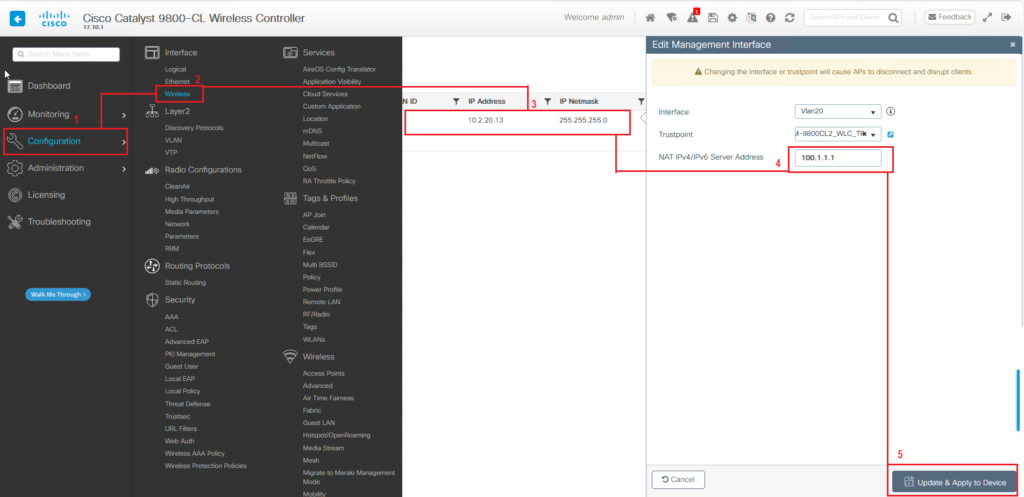
In code 17.x there also the option to configure to Public/NAT IP from the GUI. Follow the process below in order to achieve that:
The configuration part is easy to understand and implement, but why do we need to specify the public IP on the WLC? Isn’t NAT transparent to the WLC since the device performing NAT is receiving the IP packet with the public IP and than forwards it to the controller’s private IP?
Great question, Sophie. Essentially, when an IP packet from the Office Extend Access Point (OEAP) reaches the Wireless LAN Controller (WLC) through NAT, it arrives with the WLC’s private IP as its destination. However, inside this packet is a CAPWAP Discovery Request holding the WLC’s original public IP. For the WLC to recognize and respond, it must be configured to acknowledge this public IP. Without this configuration, the OEAP, which cannot use the WLC’s private IP since is not routable over the internet, won’t be able to join the controller.
It’s clear now, thanks. Can we continue with the configuration of an OfficeExtend AP?
Okey, now, once the AP has joined the WLC we need to covert it into a OfficeExtend AP. This involves a few key steps. Let me outline them for you:
-
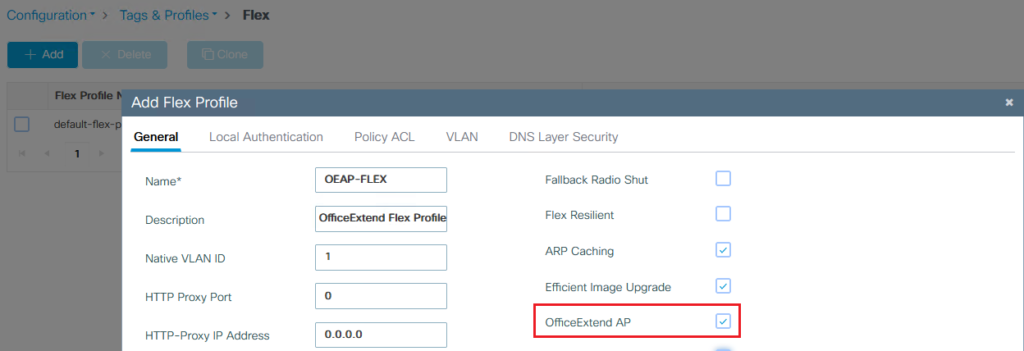
Flex Profile Creation: You start by creating a Flex profile and enabling OfficeExtend AP. This is done through ‘Configuration > Tags & Profiles > Flex’.
-
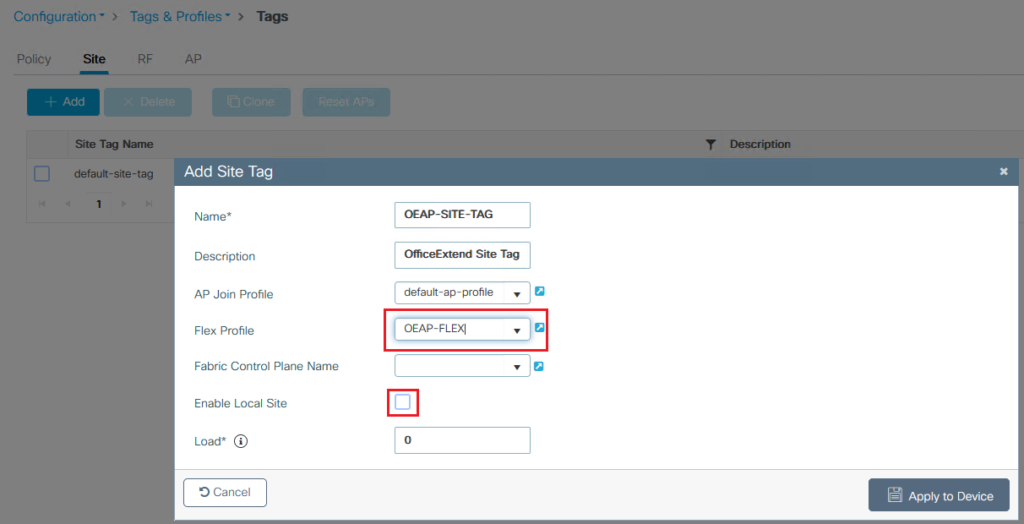
Site Tag Creation: Next, create a Site Tag and map it to the Flex Profile. Navigate to ‘Configuration > Tags & Profiles > Tags’ for this. Make sure to uncheck “Enable Local Site”.
-
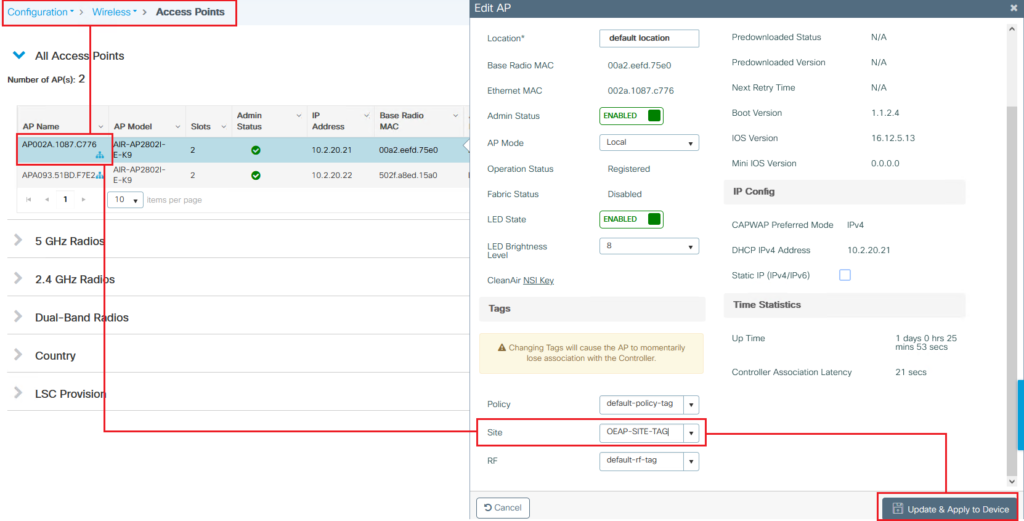
Tagging the AP: Then, tag the AP with the created Site Tag. Go to ‘Configuration > Wireless> Access Points> Select the OEAP and tag with it the Site Tag created earlier.
-
Verification: After the AP re-joins the WLC, you should verify specific configurations such as the AP’s Flex Profile, the operation state, and ensure Office Extend Mode is enabled.
Location1-WLC1#show ap name AP002A.1087.C776 config general
Cisco AP Name   : AP002A.1087.C776
=================================================
********************* OUTPUT OMMITED *********************
Site Tag Name                                   : OEAP-SITE-TAG
RF Tag Name                                     : default-rf-tag
Policy Tag Name                                 : default-policy-tag
AP join Profile                                 : default-ap-profile
Flex Profile                                    : OEAP-FLEX
********************* OUTPUT OMMITED *********************
Office Extend Mode                              : Enabled
Remember, these steps ensure that the OfficeExtend AP is correctly configured and can securely connect remote workers to the corporate network.
Professor, the configuration seems to involve multiple steps. What are these tags and how do Catalyst 9800 WLCs based on IOS XE use them?
Great question, Sophie. On the Cisco Catalyst 9800 WLC based on IOS XE, tags are crucial for managing AP features, replacing the FlexConnect Groups used in AireOS WLCs. Tags allow for a more structured and customizable management approach. There are three key types of tags:
- Policy Tag: It specifies the WLANs that an AP can provide. This tag allows for different WLAN settings across various APs. They map the SSID to the Policy Profile.
- Site Tag: This tag contains location-specific configurations, such as FlexConnect settings and local network information, crucial for APs in different geographical locations. The Site Tag specifies if the AP is running in Local Mode or FlexConnect Mode and configures the AP with the desired AP Join Profile and Flex Profile.
- RF Tag: It is used to manage RF profiles, enabling the optimization of radio frequency behavior for each AP.
By using these tags, administrators can efficiently manage a diverse set of AP configurations in a multi-site environment, each with its unique requirements. These tag can be configured once an applied to multiple APs without the need to configure them individually. Take a look at the diagram below, and see how all tag fit together to configure the AP. 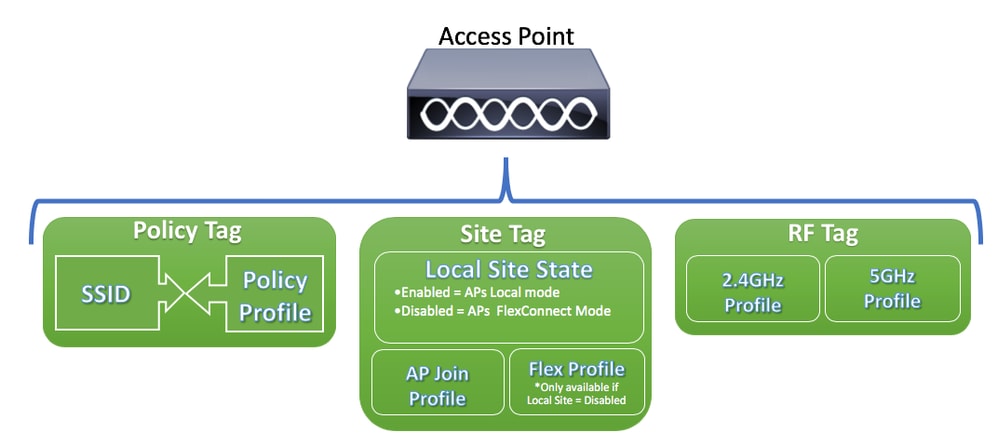
Personal SSID on OEAP
Can I take advantage of the OfficeExtend AP(OEAP) for personal use as well? For example, lets say I want to stream movies on my Smart TV and I don’t want to install another Access Point…
Yes, you can, Sophie. But you will not use the Corporate SSID, since the security policies on the Firewall might restrict access to streaming services. What you need is to create a Personal SSID on the OEAP.
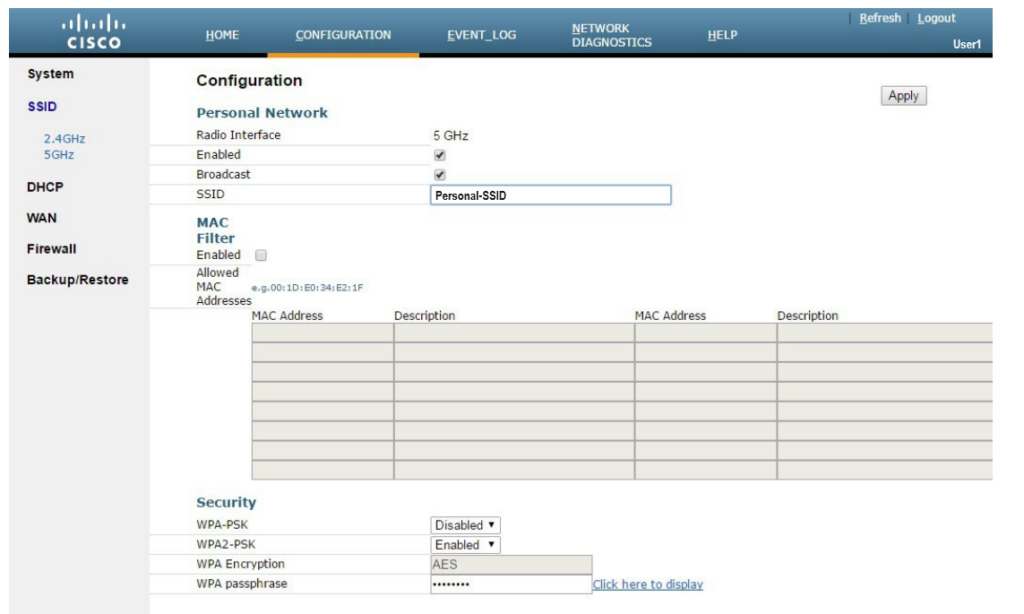
Setting up a Personal SSID on an OfficeExtend Access Point 1810 is straightforward. Here are the steps:
- Connect the AP: Start by connecting the WAN port of the OEAP to your home router. This will allow the AP to get an IP address from the router.
- Access the AP’s Interface: Connect a computer to the LAN3 port of the AP, the PC will receive an IP form range 10.0.0.0/24. Than, navigate to the AP’s default IP address in a web browser(http://10.0.0.1/).
- Log in to the AP: Use the default credentials(admin/admin) to log in to the administration page. You should change the credentials after your first login.
- Configure the SSID: Go to ‘Configuration > SSID’ and set up the Personal SSID for 2.4GHz or 5GHz.
- Set Security Options: Choose WPA-PSK or WPA2-PSK for security and enter the passphrase which will be used to connect to the SSID.
- Apply Settings: Finally, click ‘Apply’ to save and activate the settings. Take a look at the following screenshot:
This configuration enables local clients to connect to the internet and local network without tunneling their traffic back to the corporate WLC.
OEAP Split Tunneling
Professor, I have a printer on my home network. Can I access it when connected to the corporate SSID via an OfficeExtend Access Point?
Absolutely. Cisco OEAP uses a feature called Split Tunnelling to handle this. It segments your home network traffic from your corporate traffic. This means that when you’re connected to the corporate SSID on your laptop, it can still communicate with local devices like your printer.
So, my printer doesn’t have to go through the corporate network?
Correct. With Split Tunnelling, the traffic between your laptop and the printer won’t go over the corporate network. The OEAP classifies the traffic using Access Control Lists (ACLs). So, when you send a print job, it recognizes that it’s local traffic and keeps it within your home network.
And this won’t compromise the security of my corporate network?
Not at all. One of the key benefits of Cisco OEAP is that it maintains security protocols. Your home devices, like the printer, are on a separate network segment. This means they can’t access corporate data directly, protecting your company’s network.
That sounds great. But what about IP addresses? How does my printer get an IP address in this setup?
The Cisco OEAP actually advertises two SSIDs – one for corporate use and one for personal use. When your devices, like your printer, are connected to the personal SSID, they obtain an IP address from your home router. The OEAP performs NAT (Network Address Translation) to facilitate the communication between your devices on different network segments.
So, if I’ve got this right, when my laptop uses the corporate SSID to send a print job, and the printer is on the personal SSID, the OEAP acts as a bridge. It uses source NAT/PAT with its WAN IP, which is on the same subnet as the printer, connected to the personal SSID, allowing communication between my laptop and the printer.
Yes, Sophie, that’s correct. The OEAP effectively bridges the traffic between your laptop on the corporate SSID and your local printer on the personal SSID. It leverages NAT/PAT using its WAN IP, aligning with the printer’s subnet, to facilitate this communication. It allows your devices to communicate appropriately based on their network and keeps your corporate data secure while giving you the flexibility to use your home devices like normal.
Now that you understand the split tunneling function lets dive in and configure it.
Sophie, configuring split tunneling on an OEAP involves several steps:
- Define an ACL: Start by creating an Access Control List (ACL) for split tunneling in the Security section. Go to Configuration > Security > ACL and click on +Add button. Enter the name of the ACL, Split-Tunnel-ACL in this case, than, in the Rules section add a new ACE with Action set to Permit and set the Destination to your local IP range, 192.168.100.0/24. Based on the Permit action the traffic will be locally switched and sent to your home network. All the rest of the traffic will use the implicit deny rule, at the end of every ACL, and will be centrally switched to the corporate network. Set the Source to any, the protocol to IP, check the box for Log click on Add. Finally click Apply to Device.

- Configure AP as OEAP: From the previous section, Configuring OEAP on Catalyst 9800(IOS XE), you should already know how to do this.
- Link ACL to Flex Profile: Edit the Flex Profile create earlier and associate the defined ACL with it. Go to Configuration > Tags & Profiles > Flex and click on the OEAP Flex Profile to Edit it. Next, go to the Policy ACL tab and click on Add. Select the previously configured ACL in ACL Name and click on Save. Finally click on Update and Apply to Device.

- Wireless Policy Profile: Set up a Wireless Policy Profile, ensuring they align with your split tunneling requirements.
- Map WLAN to Policy Profile: Link your WLAN to the Policy Profile.
- AP Join Profile and Site Tag: Finally, set up an AP Join Profile and associate it with a Site Tag. [ngg src=”galleries” ids=”2″ display=”imagebrowser” template=”default” maximum_entity_count=”500″]
These steps ensure that traffic is appropriately split between local and corporate networks.
